Securing Connections: A Guide to Installing eduVPN v3 on RHEL 9 with SAML (Shibboleth SP) and Keycloak
In an era where online security is paramount, establishing a robust virtual private network (VPN) is crucial to safeguarding digital communications. This article delves into the process of installing eduVPN v3 on the Red Hat Enterprise Linux 9 (RHEL 9) platform, employing SAML (Security Assertion Markup Language) with Shibboleth Service Provider (SP) for authentication, and integrating Keycloak for identity management.
Install eduVPN
Firstly, we need to ensure that our system is updated and running. Also, we need to be sure that the hostname is correct.
1
hostnamectl set-hostname vpntesting.example.com
Secondly, we need to get the eduVPN v3 archive and extract the content to the current directory.
1
2
3
curl -L -O https://codeberg.org/eduVPN/deploy/archive/v3.tar.gz
tar -xvzf v3.tar.gz
cd deploy
The best part of the installation process is we have some scripts available for simple one-server deployments. This script will configure all components, and the service will be ready after the script has finished running.
In my case, I will use the deploy_el.sh script. I will modify the script because I don’t need to generate a self-signed certificate so that I will comment on the entire CERTIFICATE section from the script.
1
2
3
4
5
6
7
8
9
10
11
12
#############
# CERTIFICATE
#############
#openssl req \
#    -nodes \
#    -subj "/CN=${WEB_FQDN}" \
#    -x509 \
#    -sha256 \
#    -newkey rsa:2048 \
#    -keyout "/etc/pki/tls/private/${WEB_FQDN}.key" \
#    -out "/etc/pki/tls/certs/${WEB_FQDN}.crt" \
#    -days 90
The other parameters from the configuration script will remain untouched because we will edit it later.
1
2
3
4
5
6
7
8
9
10
11
12
13
14
15
16
17
18
19
./deploy_el.sh

DNS name of the Web Server [vpntesting.example.com]:
External Network Interface [enp1s0]:
Enable *Weekly* Automatic Update & Reboot? [y/n] (default=y)? n

- output -
########################################################################
# Portal
# ======
#     https://vpntesting.example.com/
#         User Name: vpn
#         User Pass: Ahch9woh6oht
#
# Admin
# =====
# Add 'vpn' to 'adminUserIdList' in /etc/vpn-user-portal/config.php in
# order to make yourself an admin in the portal.
########################################################################
Because I changed the script not to create a certificate, I will now add it manually. We need three files for this step: certificate (vpntesting_example_com.crt), private key (vpntesting_example.com.key), and certificate chain file (vpntesting_example_com.crt). Below are the paths to every file that we will need to create.
1
2
3
/etc/pki/tls/certs/vpntesting_example_com.crt
/etc/pki/tls/private/vpntesting.example.com.key
/etc/pki/tls/certs/vpntesting_example_com_chain.crt
We must modify the path to the key and certificate in the Apache config file.
1
2
3
SSLCertificateFile /etc/pki/tls/certs/vpntesting_example_com.crt
SSLCertificateKeyFile /etc/pki/tls/private/vpntesting.example.com.key
SSLCertificateChainFile /etc/pki/tls/certs/vpntesting_example_com_chain.crt
Install and configure SAML(Shibboleth SP)
Installation
We will install the Shibboleth via YUM because this will allow us to manage the Shibboleth packages in a standard way and pick up updates using a single command. Based on the Shibboleth documentation, we must add the Shibb repo to our repos.d directory. So, we will create the Shibboleth repo file, and we will add the following content (generated from here)
1
2
3
4
5
6
7
8
9
[shibboleth]
name=Shibboleth (rockylinux9)
# Please report any problems to https://shibboleth.atlassian.net/jira
type=rpm-md
mirrorlist=https://shibboleth.net/cgi-bin/mirrorlist.cgi/rockylinux9
gpgcheck=1
gpgkey=https://shibboleth.net/downloads/service-provider/RPMS/repomd.xml.key
        https://shibboleth.net/downloads/service-provider/RPMS/cantor.repomd.xml.key
enabled=1
Now, let’s install the package. Check the OS version using uname -m command.
Be careful not to install 64-bit and 32-bit versions on a 64-bit server accidentally. The yum repository contains both versions for some OSs, and the OS will think it can install both.
After the installation, we will start and enable this service.
1
2
dnf install shibboleth.x86_64
systemctl enable --now shibd
Configuration
Based on the eduVPN and Shibboleth documentation, we need to adjust the configuration file /etc/shibboleth/shibboleth2.xml. We need to update:
- entityID from
<ApplicationDefaults>1
<ApplicationDefaults entityID="https://vpntesting.example.com/shibboleth"
- entityID from the SSO element
1
2
3
 <SSO entityID="https://sso.example.com/auth/realms/EXAMPLE">
   SAML2
 </SSO>
- The path to the static metadata file from our keycloak
1
 <MetadataProvider type="XML" validate="true" path="descriptor.xml"/>
We can obtain the static metadata file by accessing the Keycloak SAML 2.0 Identity Provider Metadata Endpoint: https://sso.example.com/auth/realms/EXAMPLE/protocol/saml/descriptor. We need to save this file in /etc/shibboleth/descriptor.xml.
After all these changes, we need to check the configuration file. We can run the shibd -t command, and if no errors are displayed, we can reload the configuration by restarting the service.
1
2
3
4
5
6
shibd -t

2024-02-20 10:12:39 WARN Shibboleth.DEPRECATION : MetadataGenerator handler
overall configuration is loadable, check console or log for non-fatal problems

systemctl restart shibd
Now, we can download the Metadata we will use on KeyCloak by accessing https://vpntesting.example.com/Shibboleth.sso/Metadata.
If when we access the above link, we get the ‘Metadata Request Failed,’ we need to check the SELinux. It prevents socket communication between Apache and Shibd. Follow the steps below.
We need a policy that permits the Apache server (httpd) to access
/var/run/shibboleth/shibd.sock.We can do this by creating a module once we have logged the problem by running SELinux in
permissivemode by runningsetenforce. Remember to reload the webpage after setting the Selinux in permissive mode.
After we run the above commands, we will get two files named http_mod_shib.pp and http_mod_shib.te. Next, compile and install the policy file with:
Keycloak
We need to configure a client based on the Metadata generated above. Firstly, we need to ensure that we have selected the desired realm, and then we can navigate to clients from the left menu. Here, we click on “Import Client”. 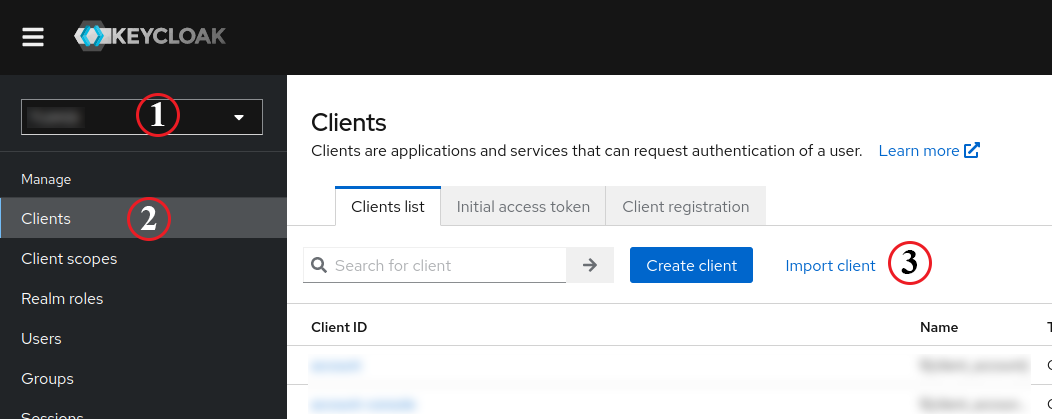
We will upload the Metadata file in the new window by pressing Browse… and save the current config. 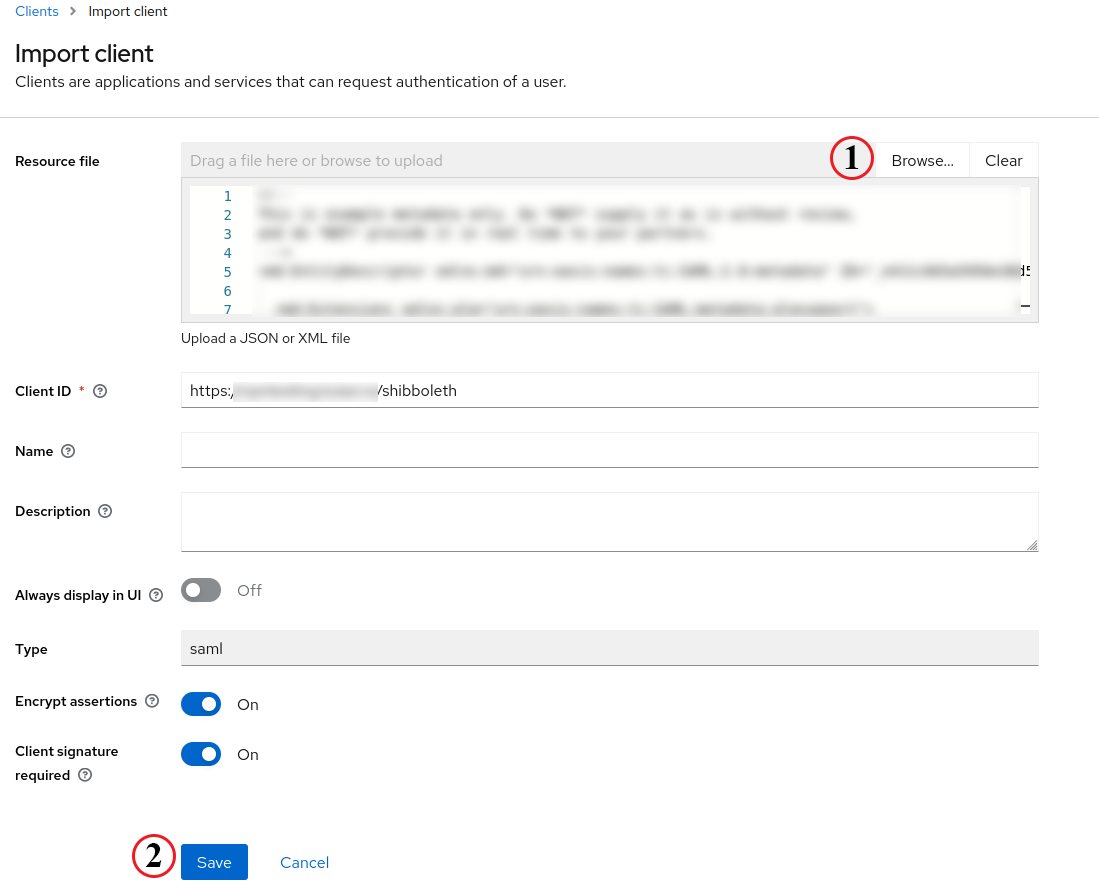
We must select the Name ID format in the Client Details > Settings, SAML capabilities section. The eduVPN will use this parameter as the UserID when it creates users on the portal. I will use the email for this option.
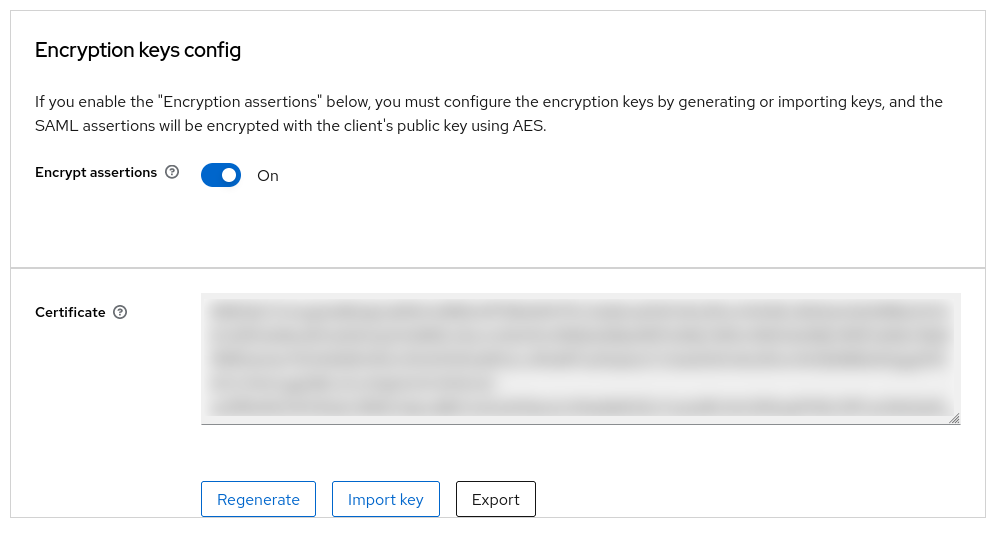
Next, go to Keys > Encryption keys config and set this option to Off. We don’t want any encryption for now because we may need to do some troubleshooting.
In this step, we need to define some roles for those who can connect and use our instance of VPN. We can do this using Client Scopes. I will grant access based on the affiliation type and a list of roles with 0 or more.
From Client Scopes, select the single client scope assigned, and here, we need to add a mapper.
At this point, I already have some mappers created on Keycloak. One mapper I will use here will return the user affiliation based on the domain used. Example: For a user with the email address [email protected], the affiliation value will be domain1; for a user with the email address [email protected], the affiliation value will be domain2.
For info about how to create this kind of mapper, please read the Keycloak documentation for JavaScript Providers
Click on Configure a new mapper and select the mapper needed. Here, I will use the mapper described above, named affiliation. A new page will be displayed to us, where we will set a name for this mapper, a friendly name, and a SAML Attribute Name, which we will use in the Shibboleth config. 
For now, we have the affiliation attribute; let’s add the attribute, which will contain a list of roles. This kind of mapper will be present in a default Keycloak installation. From Add mapper > By configuration, select Role list. Again, we will set a name, a Role attribute name, a friendly name, and SAML Attribute NameFormat. The NameFormat needs to be URI Reference. You can use whatever you want for the values, but remember that we need to use these values in the Shibboleth config. Don’t forget to turn off the Single Role Attribute. 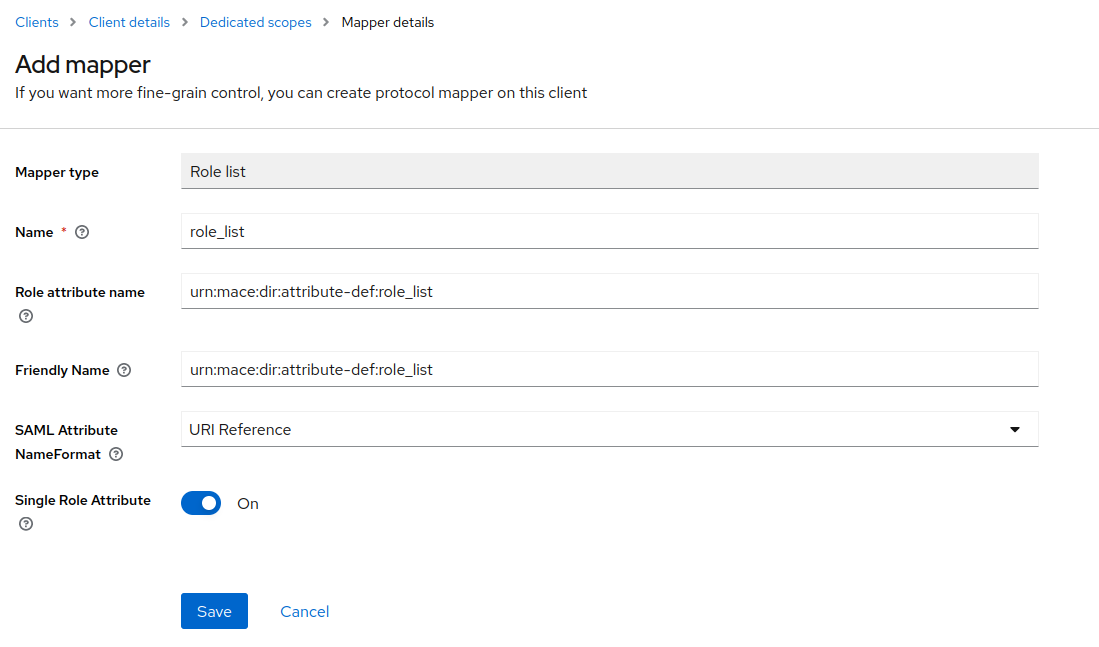
Now, the client knows how to map the attributes, but the client may not be able to access them. Go to Client Scopes, select the single client scope assigned, and from the top menu, select Scope. Here, select all the scopes that you want the client to be able to access. 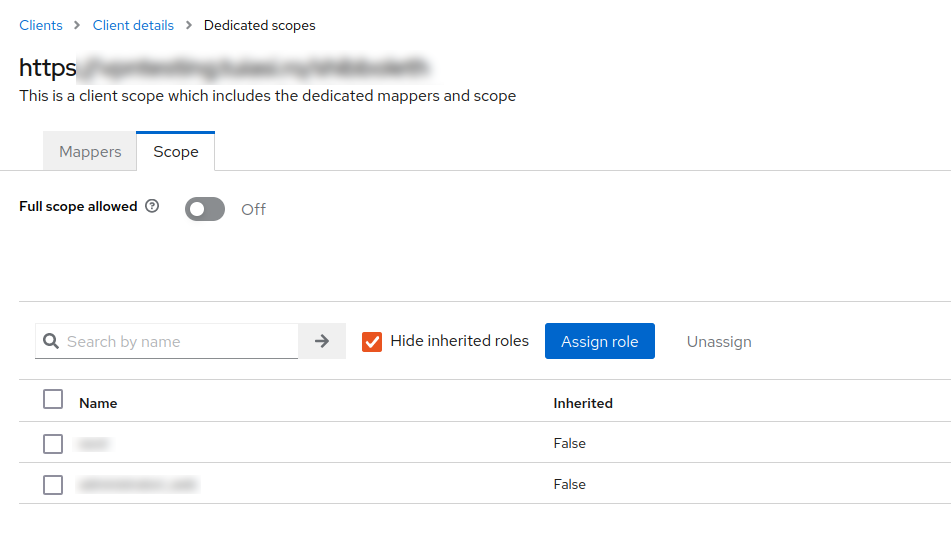
httpd
We need to modify the Apache config file. On the 443 virtual host, we need to add the following content:
1
2
3
4
5
6
7
8
9
10
11
12
13
14
15
16
17
18
19
<Location /vpn-user-portal>
    AuthType shibboleth
    ShibRequestSetting requireSession 1
    <RequireAny>
        Require shib-attr userType atr_1 atr_2
        Require shib-attr role_list atr_3 atr_4 atr_5 atr_6
    </RequireAny>
</Location>


# do not restrict API Endpoint as used by VPN clients
<Location /vpn-user-portal/api>
    Require all granted
</Location>

# do not secure OAuth Token Endpoint as used by VPN clients
<Location /vpn-user-portal/oauth/token>
    Require all granted
</Location>
For location /vpn-user-portal the user needs to have at least one of the following attributes: the userType needs to be atr_1 or atr_2, and the role_list needs to have at least one of the following: atr_3, atr_4, atr_5, atr_6. Need to be at least one of the attributes because we use <RequireAny> instead of <RequireAll>. After this, we will reload the httpd service.
1
systemctl reload httpd
Shibboleth Attribute Map
Until this point, we can access the vpntesting.example.com page; after accessing it, we will be redirected to the Keycloak page where we should log in, and after that, we will receive an error with a message like “Unauthorized.” It happens because we still need to configure the Shibboleth fully. Firstly, let’s check the attributes received from the Keycloak. Install the SAML-tracer extension and open it. Navigate to the vpntesting.example.com and try to log in. In the SAML-tracer window, check the POST SAML request > SAML tab.
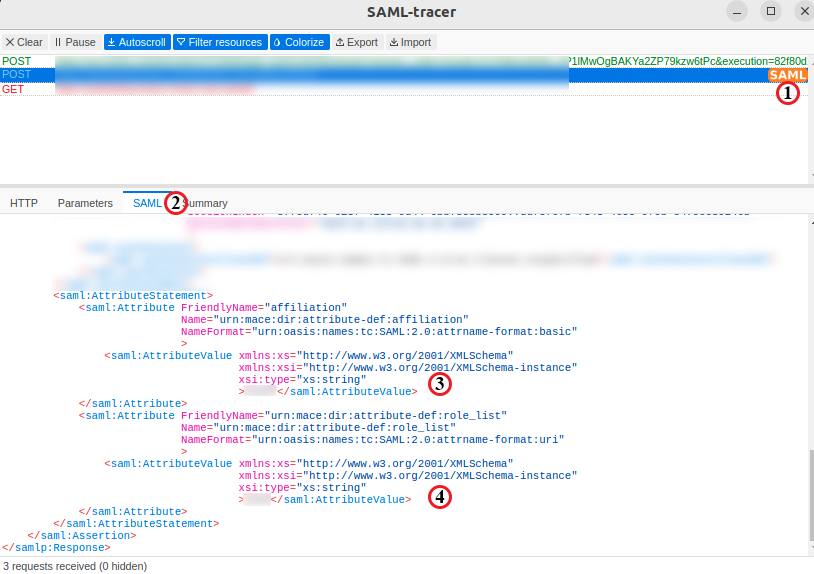
Here, we will find a list of attributes that the Keycloak sends after we successfully log in. These attributes need to be mapped in the Shibboleth config. Open the /etc/shibboleth/attribute-map.xml and add the following:
1
2
3
4
5
6
7
8
9
10
11
12
<!-- email -->
<Attribute name="" id="persistent-id">
    <AttributeDecoder xsi:type="NameIDAttributeDecoder" formatter="$Name" defaultQualifiers="true"/>
</Attribute>

<!-- Role List -->
<Attribute name=" " id="role_list">
    <AttributeDecoder xsi:type="StringAttributeDecoder" caseSensitive="false"/>
</Attribute>

<!-- Affilitation - userType-->
<Attribute name=" " nameFormat=" " id="userType"/>
For every element from the attribute-map.xml, copy the name value and paste it into the above code. We can find all of these values in the SAML response. In the end, we need to restart the Shibd service.
1
systemctl restart shibd
eduVPN portal
Open the /etc/vpn-user-portal/config.php file and set the authModule and ShibAuthModule options.
1
2
3
4
5
6
7
8
'authModule' => 'ShibAuthModule',

'ShibAuthModule' => [
   'userIdAttribute' => 'persistent-id',
   // ** AUTHORIZATION | PERMISSIONS **
   'permissionAttributeList' => ['role_list'],
],
The values for userIdAttribute and permissionAttributeList are defined in the attribute-map.xml.
Now, we are all set, and the authentification process should work. Navigate to vpntesting.example.com and try to log in. If the login was successful, the home page should appear. 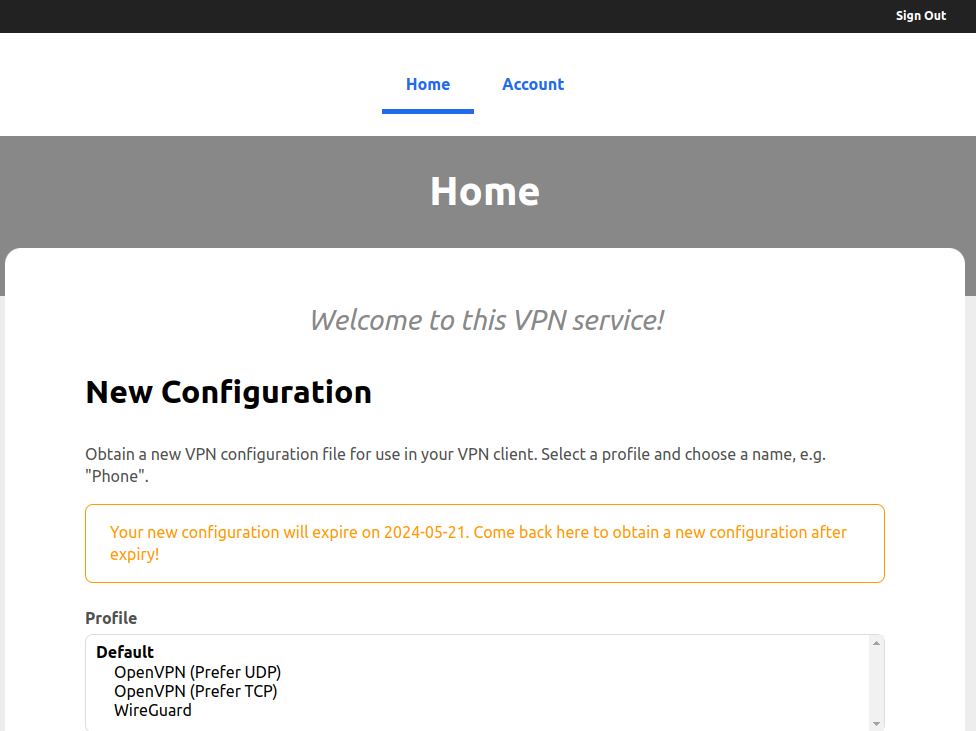
In case you have any problems:
- If, in the SAML Tracer, you don’t find any attributes that you set in the Keycloak, it means that there are some problems regarding the Client Scopes. Check again the configuration in the Keycloak.
- If you successfully receive attributes after login, you may have some problems with attribute mapping. Check the
attribute-map.xmlfile.
If you want (it’s a good idea) to change the default admin, you need to edit the /etc/vpn-user-portal/config.php file. Here, you will have an array of admin users.
1
2
// list of userIds that have access to the admin
'adminUserIdList' => ['[email protected]'],
Profile Configuration
We can create multiple profiles based on our implementation scheme. In this case, I will create a single profile for employees. To do this, we need to edit /etc/vpn-user-portal/config.php and change the following parameters:
- profileId - Unique identifier for this profile
- value: employees
- displayName - The name that our users will see when they try to connect to the VPN
- value: Employee
- hostname - The hostname used by VPN clients
- value: vpntesting.example.com
- defaultGateway - Routing all traffic over VPN
- value: false
- I want to route only some traffic over the eduVPN. I need access to only some resources.
- routeList - The resources that will be accessed over VPN
- value: [‘192.168.2.0/24’, ‘192.168.3.0/24’]
- aclPermissionList - The roles that users need to be able to access this profile. These roles are the ones received from Keycloak
- value: [‘atr_3’, ‘atr_6’]
- Users will have access if at least one attribute is present. The permissions are thus “OR”.
- wRangeFour - IPv4 range of the network that will be assigned to WireGuard
- value: ‘10.100.10.0/24’
- wRangeSix - IPv6 range of the network that will be assigned to WireGuard
- value: ‘fd13:9e82:1407:9051::/64’
- If you don’t use IPv6, run
/usr/libexec/vpn-user-portal/generate-prefix -6to receive a valid address.
After we save the desired configuration, we need to apply the modifications:
1
vpn-maint-apply-changes
As a hint, remember the firewall. In my case, I don’t need NAT, so that I will delete the entire postrouting chain.
1
2
3
4
5
chain postrouting {
        type nat hook postrouting priority srcnat; policy accept;
        ip saddr { 10.0.0.0/8, 172.16.0.0/12, 192.168.0.0/16 } oifname "enp1s0" masquerade
        ip6 saddr fc00::/7 oifname "enp1s0" masquerade
}
If you use WireGuard and need help understanding the routing process, check this great article.
In the end, we can now enable “Encryption keys config.” We can do this by navigating to Clients > Keys > Encryption keys config.